|
Noise
It's quiet -- very quiet. But not silent. The only noise is the
barely audible hum from the hard disk. Thanks to the fluid dynamic
bearings, this isn't the annoying high-pitched whine that older 2.5"
disks produced. I'm very pernickety about noise, and I find it quite
acceptable. After a few months I upgraded the internal disk in my G4 to a 7200rpm 2.5"
model (Hitachi TravelStar 7K60) which is very slightly louder, 20GB smaller,
but noticably faster.
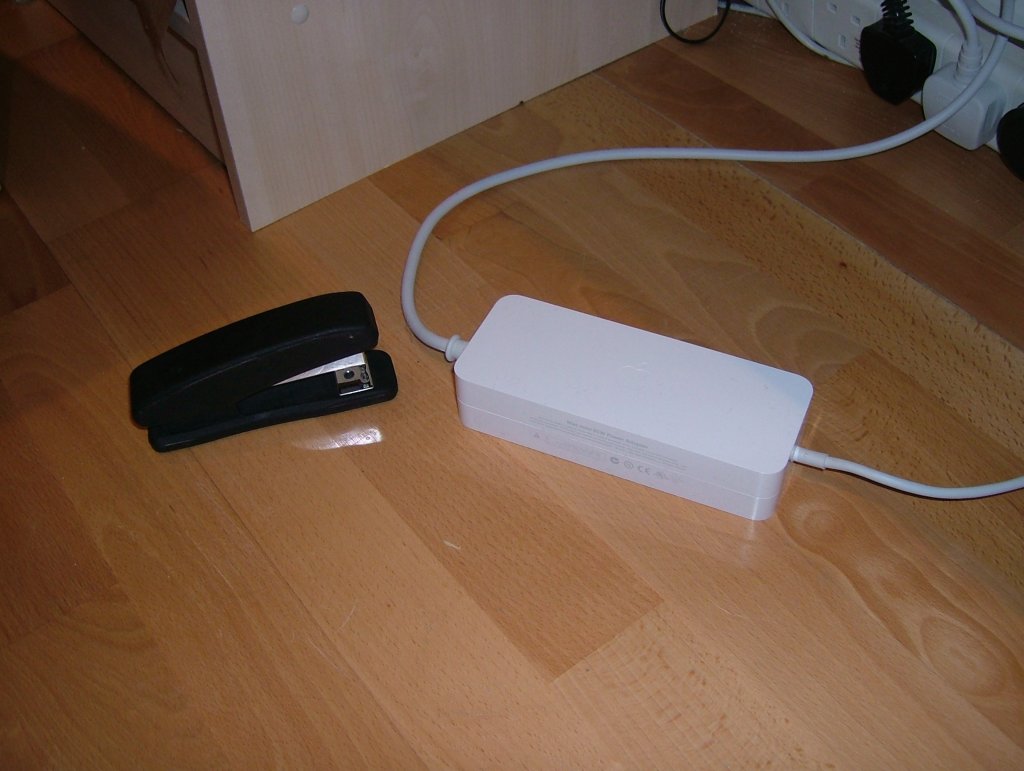
The Mac Mini has a fanless external 85W switch-mode power supply,
about half the size of the Mac itself (picture
here), moving a major source of heat out of the metal
chassis. Combined with the G4 processor's relatively low clock speed,
this was presumably key to Apple's thermal design. Having less heat to
dissipate means that, while the Mac Mini does have a small cooling
fan, it rarely spins up to a high speed. Performing normal office work
it is inaudible. The only noise coming out of the Mac Mini is the
quiet hum of the hard disk, and even that can spin down automatically
when the system is completely idle.
The optical drive is relatively loud when in use. I never really use
optical media, so this doesn't bother me. It may bother you.
Inside the Mac Mini
Upgrading the RAM requires opening the case. See
this page, where you can download a nice PDF and a video showing how to
disassemble the system.
In fact, the PDF is a complete maintenance guide, presumably
written for Apple service technicians.
You'll need a putty/spreading knife, be sure to buy the very
thinnest possible. The tool I used is extremely thin and springy
and still it left little gouge marks on the base of the chassis.
Please don't attempt to open your Mac unless you're familiar with
opening consumer electronics devices. If you break your Mac, you get
to keep both halves.
Linux Hardware support
| MPC7447A ("G4") processor with Altivec | Supported |
| Apple UniNorth 2 AGP 4X bridge | Supported |
| Apple UniNorth 2 FireWire | Supported |
| Apple Intrepid ATA/100 controller | Supported |
| Apple 10/100Mbit ethernet (Sun GEM) | Supported |
| NEC PCI USB 2.0 controller (EHCI/OHCI) | Supported |
| ATI Radeon 9200 | Supported |
| Apple Intrepid Audio | Supported |
| Apple Bluetooth module | Untested (but should work) |
| Apple 56K V.92 modem | Untested (but may work) |
| Apple Airport Extreme (802.11g) | Supported (work in progress) |
I did not expect the 802.11g wireless ("Airport Extreme") to ever work. The Apple
Airport Extreme module uses a PCI 802.11g chipset from Broadcom, and there were
no specifications available to write an open-source driver for this hardware.
However, some very dedicated people have set about reverse engineering the hardware
and writing their own specifications. This then allowed a second team to produce an
open source driver for Broadcom BCM43xx chips.
This driver is included in recent linux kernels.
I'm not sure about the modem or the optional Bluetooth module, I've not
tested either yet.
Ben Herrenschmidt (all praise BenH!) has fixed the audio driver. Apparently his patch is
in kernel 2.6.12-rc4 or later, and you need alsa-lib 1.0.9rc3 or later.
A few odd problems I've discovered:
- If I plug the firewire port into the firewire port on my PC, it
seems to interfere with the PC's power supply. It's like holding down
the "reset" button on the PC. This makes it impossible to use
"firewire target disk mode" on the Mac Mini. This may turn out to be a
problem with the firewire card in my PC; I've not been able to test
with another system yet.
- The "radeon" driver in kernel 2.6.10 cannot reliably drive my
1600x1200 LCD over DVI. The image flickers, as if the timing was
wrong. Mac OS X can drive this LCD fine on the same
hardware, so it appears to be a problem with the "radeon" driver in
2.6.10. The driver in 2.6.9 fares better, but the screen is afflicted
with some sort of bizarre technicolour snow. Very annoying. The driver
in kernel 2.6.9 can drive my 1280x1024 LCD over DVI without any
problems, and I assume it's fine at lower resolutions too. I've not
tested 2.6.10 with the 1280x1024 LCD yet.
Installing Debian GNU/Linux
Tools you will require:
- Apple Mac OS X installation media (comes with the Mac)
- Internet connection
- Blank CD-R
- Weak lemon drink
The following process will erase your Mac's internal hard
disk. Any data on it will be lost. Copy anything you value to another
computer or onto writable optical media before proceeding.
When you receive your Mac mini from Apple, it will have a single
partition for Mac OS X which occupies the entire disk. In order to
install Debian, you'll need to set aside part of the disk for Debian's
filesystem. This process is called "partitioning". When we repartition
the disk, any filesystems on it must be reformatted (or
"re-initialised"
in Apple-speak). If you have any valuable data on your Mac, copy it
somewhere safe (preferably another computer) before proceeding.
If you want your Mac to run only Debian, you can skip ahead to
burning the installation CD. If you want to dual-boot Mac OS X and
Debian, read on.
With Mac OS X running, insert the gray "Mac OS X Install Disc 1"
that you received with your Mac. Run the installer from the disc and,
when prompted, click the "Restart" button. Your Mac Mini will reboot
(bong!) and load the Mac OS X installer from the optical
disc. If you've nadgered your OS X installation already, just reboot
with the disc in the drive and hold down the "C" key on your
keyboard -- this will force the Mac's firmware to try to boot from the
internal optical drive.
With the installer running, open on the "Installer" menu in the top
left of the screen. Choose "Open Disk Utility". You'll now need to
tell Disk Utility how to partition the hard disk. I asked for five
partitions. Most of these I marked as "Free Space". This is fine, we
will re-assign their purpose in the Debian installer. Disk Utility is
a little fiddly to use, but persevere and you'll figure it out in the
end. A few tips: If you use the mouse to resize a partition below one
gigabyte, it starts counting in megabytes instead. This allows you to
type in the exact size you want for small partitions. To select a
partition which is too small to be visible, click on another partition
and use the tab key on the keyboard.
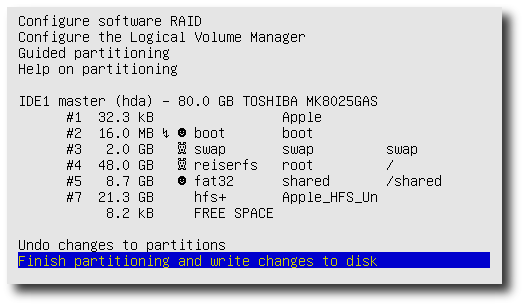
This table shows how I partitioned my 80GB internal disk. I decided
to have an 8GB partition which I would format as FAT32. This allows me
to easily and reliably share files between OS X and Linux, both of
which have good FAT32 support but, at the time of writing, poor or
incomplete support for each other's native filesystems.
| Partition | Type | Size | Purpose |
| Partition 1 | Free Space | 16 MB | Debian Bootstrap |
| Partition 2 | Free Space | 2 GB | Debian swap space |
| Partition 3 | Free Space | 44.5 GB | Debian root filesystem |
| Partition 4 | Free Space | 8 GB | Shared FAT32 filesystem |
| Partition 5 | Mac OS Extended (Journalled) | 20 GB | Mac OS X filesystem |
A word of caution: I found that Disk Utility would sometimes "lose"
some space, presumably this is a bug in the software. Check that the
partition sizes add up to the right amount when you're done resizing
them. And remember than an 80 "marketing-gigabyte" disk contains only
74.5 "real-gigabytes". I had to quit and re-start Disk Utility several
times before I managed to make it work right. I think the trick was to
do the last partition first, then start down from the first one.
Once you're done, click the Partition button, quit Disk Utility,
and install Mac OS X onto your new partition.
Drink your weak lemon drink now.
Eventually the Mac will reboot into Mac OS X so you give
all your personal details to Apple and then get on with life in OS
X. Your computer now has some empty partitions for Debian to install
itself onto.
Next up you'll need a Debian Installation CD.
Debian has several "branches", several of which are in continuous
development. New versions of software are uploaded into the
unstable branch. After a few weeks without serious bugs being
found in unstable, the testing branch accepts these
packages. Periodically Debian "freezes" testing and releases
it as a new stable branch. A new branch is then created to
become the new testing.
I'm going to show you how to install "Sarge", which is the name for
the current testing branch. It's not quite the
white-knuckle-ride that the unstable branch is, and unlike the
stable branch it contains pretty up-to-date software. It's the
smart choice.
Here's an outline of the process:
- Download an ISO image from the Debian web site
- Burn ISO image to a blank CD-R
- Reboot into the Debian installer
- Install the Debian "base system"; this is a minimal Debian system
with just enough tools to download and install any additional
packages you require
- Reboot into the Debian base system
- Select the packages you'd like to use
- Download and install the packages
- Build an optimized kernel
- Enjoy!
Run Safari and go to the Debian
Installer page. Here you can download an ISO file, which is a
filesystem image ready to be burnt onto a blank CD-R. I downloaded the
Release Candidate 2 ("rc2") version of the installer. If a more recent
version is available, you may wish to try that instead. There are many
different CD images available.
You want one of the "powerpc" images.
There are several different sizes available. If you connect to the
Internet through your Mac's ethernet port, I'd recommend the
businesscard CD image, which is about 110MB. This contains enough
to install the base system without any further downloads. If you don't
mind downloading a lot, or if you connect to the Internet through the
Mac's internal modem, it might be a better idea to download the full CD set
instead, as these include a snapshot of the most popular
packages. Don't worry that there are 14(!) CDs, they are organised
with the most popular software on the low numbered CDs. You can get a
working system with just CD 1, I believe. Each full CD is about 650MB.
Once you've got a lovely ISO, you'll want to burn it to CD. You
can't just burn it as a file on a CD, the file is itself an image of a
CD ("iso9660") filesystem. Open your "Applications" folder, then the
"Utilities" folder, and run "Disk Utility" again. Sometimes it feels
like this is the only OS X application I ever run. Anyway, from
the "Images" menu select "Open". Find your ISO file and open it. Click
on the ISO image and then click the "Burn" button on the toolbar. Feed
your Mac Mini a blank CD-R and drink some weak lemon drink now.
Before you reboot, you might want to flick through
the Sarge installation
manual for PowerPC. We're about to start Chapter 5.
Reboot or power on your machine. Before the "bong!", hold down the
"C" key. The bootstrap on the Debian CD should load. If you just end up
in OS X, try again.
At the "boot:" prompt, just hit enter. The kernel will
boot. After a few seconds, the installer will start and you'll be asked
a few simple questions. Ideally you would be connected to the Internet
through the Mac Mini's ethernet port, in which case you can tell the
installer to use "eth0" as the primary network interface.
After downloading the package lists from your local Debian archive,
the installer will launch the partitioning tool. We've already
partitioned our disk, but we need to use the tool to set the correct
partition types. When prompted, choose to "Manually edit the
partition table". If you followed my five partition plan earlier,
this is what you want to end up with:
| 
 and Audrey (G4)")